How to examine the lungs – and respiratory system
Examination of the chest is a fundamental technique that all doctors need to be able to perform.
Introduction (‘WIPER’)
W – Wash your hands.
I – Introduce yourself to the patient.
P – Permission. Explain that you wish to perform a respiratory examination and obtain consent for the examination. Pain. Ask the patient if they are in any pain and to tell you if they experience any during the examination.
E – Expose the necessary parts of the patient. Ideally the patient should be undressed from the waist up taking care to ensure the patient is not cold or unnecessarily embarrassed.
R – Reposition the patient. In this examination the patient should be supine and reclined
at 45 degrees.
Peripheral examination
End of the bed
- First look at the patient from the end of the bed for signs of breathlessness
- It is also important to look at the surrounding environment for sputum pots (look in it), nebulisers, peak-flow meters, inhalers or oxygen tubing.

Inspection from end of bed is important. Take your time. It calms you down
Hands
- Start with a medical diagnostic handshake
- Look at the hands, fingers and nails -for clubbing (note this is best checked by looking at finger from the side), tar staining and peripheral cyanosis

Doctors can tell alot from the hands
- Examine for tremor and a carbon dioxide retention flap
- Palpate the radial pulse to calculate heart rate. 15 seconds is enough (you are trying to detect a tachycardia; the precise rate isnt that important). At this time also assess respiratory rate and determine the pattern of breathing

Looking for CO2 flap
- Locate and palpate the brachial pulse and assess its volume and character, feeling for a bounding pulse (which can be a sign of carbon dioxide retention).
Face and neck
- Look at the patient’s eyes and face for signs of Horner’s syndrome
- Inspect the conjunctiva for signs of anaemia
- Look at the lips and tongue for central cyanosis
- Lie the patient at 45 degrees and assess JVP

Examination of JVP using the hepatojugular reflux
- Palpate the cervical, supraclavicular and axillary lymph nodes – ask to do this. The examiner may say ‘please move on’ as it takes quite alot of time

Palpation of supraclavicular nodes
Note. Forgetting the JVP is a serious omission.
Examination of the chest
Inspection
Look at the chest wall for:
- Chest wall deformity (e.g. barrel chest, pectus excavatum/carinatum, scoliosis or kyphosis)
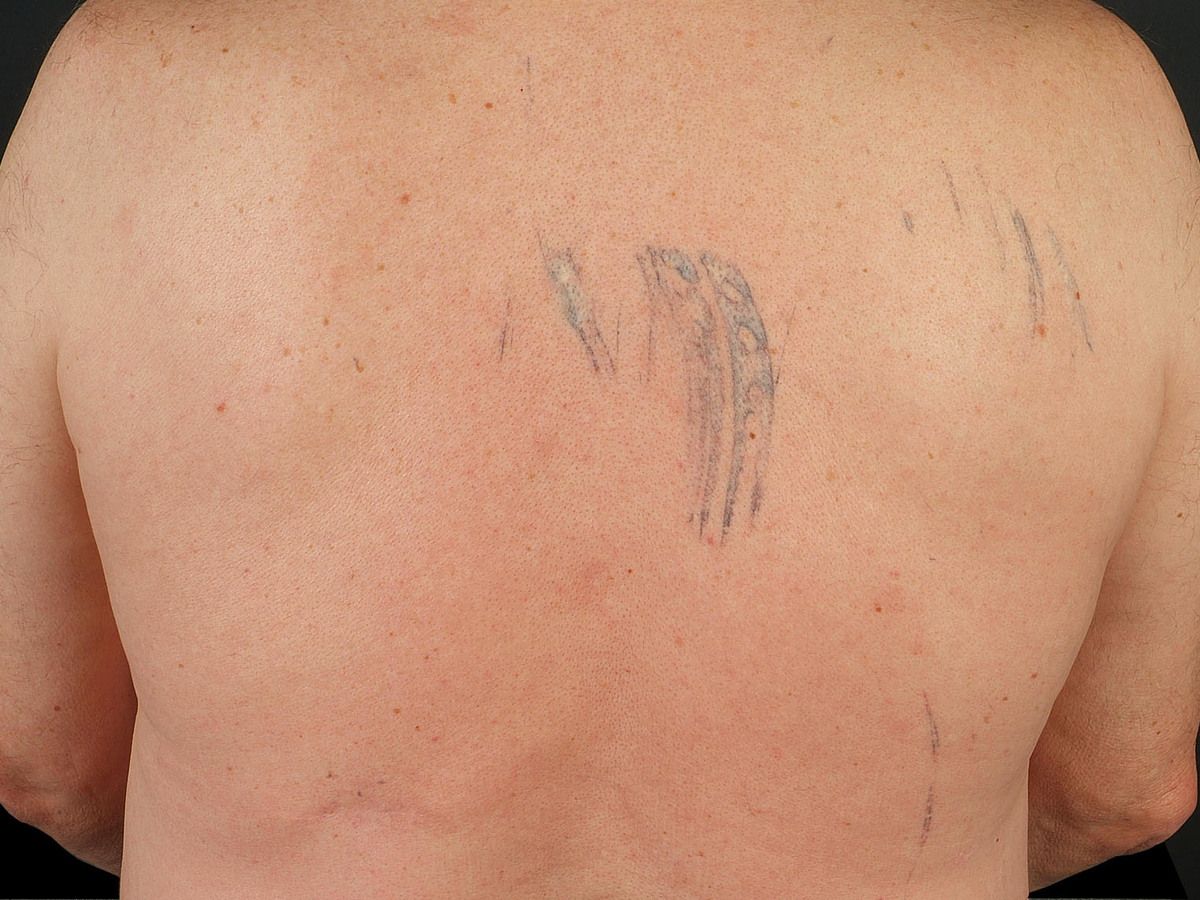
- Signs of previous TB (phrenic nerve crush) or occupational exposure (e.g. coal dust tattoos in a miner)
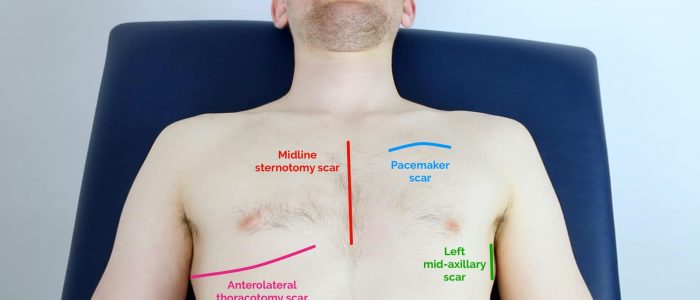
- Previous scars (front and back) – e.g. thoracotomy scar
- Use of accessory muscles
- Asymmetry of chest wall expansion (ask patient to take deep breath)
- Next note the pattern of breathing; is it regular, what is the rate?


Coal dust tattoo and thoracotomy scars
Palpation
Palpate the trachea – by placing a finger either side of the trachea and judging whether the distance between it and the sternomastoid tendons are equal on both sides. Before doing this warn the patient that this might be slightly uncomfortable

Palpation of trachea
- Assess chest expansion on front of chest – by putting the fingers of both your hands as far round the chest as possible and then bring your thumbs together in the midline but not touching the chest wall. Ask your patient to take a deep breath and observe whether the distance moved is the same for both thumbs

Assessing chest expansion
- Palpate for tactile vocal fremitus (TVF) – by placing the edge or flat of your hand on the chest and asking your patient to say ‘ninety nine’. This should be performed in a systematic fashion, comparing each side and covering all areas of the front and back of the thorax (including the axilla)

Assessing tactile vocal fremitus
- The patient is then asked to lean forward and the examine the posterior aspect of the patient’s chest
- Front and back, compare right to left.
Percussion
- Start percussion by tapping directly in the middle of both clavicles
- Then work down the front of the chest in a systematic manner comparing each side and including the axillary region

Percuss using two firm taps to middle phalanx of middle finger of non-dominant hand
- The patient is then asked to lean forward and the examine the posterior aspect of the patient’s chest.
- Front and back, compare right to left.
Auscultation
- Auscultation is then performed in a similar manner using the diaphragm of your stethoscope. Front first
- Ask the patient to take deep breaths through their mouth and commencing at the apices work down the chest in a stepwise manner, comparing right to left, with the other and remembering to include the axillary region
- Listen for breath sounds – are they vesicular (normal)? Next are there any added sounds (wheeze, crackles, or rubs)?

Auscultation of the chest
- Assess vocal resonance (VR): use the same auscultation technique but ask patient to say ‘ninety nine’. If appropriate (normally if consolidation is suspected) test for whispering pectoriloquy by asking patient to whisper (if consolidation present the sound will still be heard clearly)
- The patient is then asked to lean forward and the examine the posterior aspect of the patient’s chest.
Finishing off
The examiner may say, “is there anything more you want to do?”
State that you would complete the examination by:
- Checking for ankle oedema (cor pulmonale), ans asking if the examiner would like you to examine the liver (cor pulmonale)
- Measuring the peak flow rate
- Measuring the oxygen saturation
- Examining the contents of the sputum pot.
Finally explain to the patient that you have finished your examination, thank them for their cooperation and help them to get dressed.
Summary
We have described how to examine the lungs – and respiratory system. We hope it has been helpful.
Other resources
Respiratory examination (medistudents)
Guide to examination (UCL)

